General Note: Duradek does not supply framing sheeting and underlayment products. Always refer to manufacturer’s written instructions and local building code requirements. Below are Duradek’s recommendations. For complete and up-to-date installation procedures refer to Tiledek’s Installation manual.Ask your Duradek dealer for a copy.
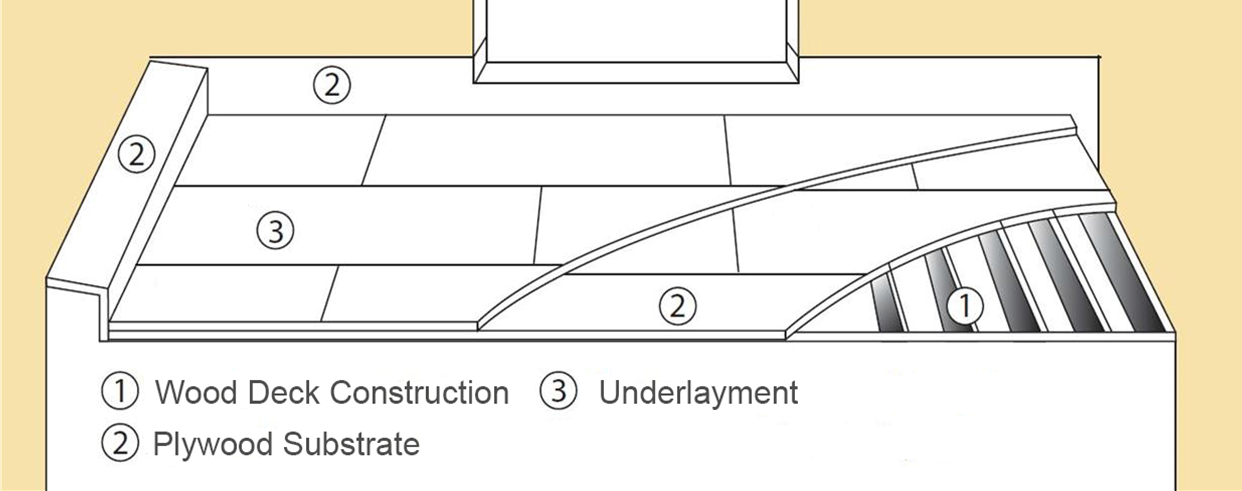
Numbers on drawing above reference notes below:
1. Wood Deck Construction
Structural Design: To governing building code requirements.
Deflection: Roof decks must have a maximum allowable deflection of L/720 (as an expressed ratio of the clear span).
Joist Spacing: 16″ o.c. maximum.
Slope: Minimum ¼” per foot (2%, 1 in 48) positive slope is required to prevent standing water.
Door Openings: Sill of rough door openings to be 3″ to 6″ above elevation of finished tile.
Framing Lumber: Install Kiln-dried lumber with crown sides up.
2. Plywood Sub Floor Construction
Plywood requirements:
Profile: T&G
Grade: C-C Sheathing Grade
Thickness: 3/4” (18.5mm)
No treated plywood to be used
Plywood Installation:
Placement: Plywood panels to be installed with the surface grain at right angles to the joists. End joints shall be supported over 2″ wood joists. At unsupported joints install 2″ x 4″ blocking securely nailed between framing members.
Lightly gap boards, do not force boards together.
Fasteners: Recommend #10 exterior wood deck screw either stainless steel or coated with non-staining finish or hot dipped galvanized ring thread or spiral nails. Nails should be driven in at a slight angle to reduce nail pops. Fasteners to be of sufficient length to penetrate deck framing members 1″ (25 mm) min. 1.25″ (31.75 mm) max. Slightly recess all fastener heads.
Fastener Spacing: Space fasteners 6″ (150 mm) o.c. along edges and 8″ (200 mm) o.c. along intermediate supports. Drive nails on slight angle. Slightly recess all fastener heads.
Curbs & Upstands: Apply 1/2” min plywood (see plywood specs above) to vertical and horizontal surfaces to receive Tiledek membrane.
3. Underlayment
A. Cement Board Underlayment: Recommended for All Applications and REQUIRED for Decks Over Non-Condition Areas (Open or Storage Areas)
Cement Board Underlayment: USG (USA) or CGC (CAN) DUROCK® BRAND CEMENT BOARD WITH EDGEGUARD™. 1/2” x 4 ft. x 8 ft.
Joint Compound: Mapei Planipatch, Latex-Fortified mortar or equal
Underlayment installation:
>>>>>> Install CBU panels smooth side up <<<<<<
Place panels with joints maximum stagger from plywood subfloor joints. End joints to be placed not over structural framing but at 1/4 span point (ie 4″ off center for a 16″ joist spacing). Fit panels closely but do not force together, leave a maximum 1/8” (3 mm) gap at panel edges and ends. Leave 1/4” (6 mm) gap along walls. Fasten panels to subfloor while mortar is wet with 1-1/4 (32 mm) wood screws spaced 6″ o.c. in both directions and placed at 1/2” (12.5 mm) from ends and edges. Do not fasten into wood structural framing.
Laminate 1/2” CBU to 3/4” plywood subfloor using polymer modified mortar. Apply with 1/4” (6 mm) square notched trowel. Install CBU immediately. Laminate and secure one panel and at a time.
Finished surface to be true to plane within 1/8” in 10 feet (3.2 mm in 3 m).
Underlayment Preparation:
Ensure all screw heads are set at, or just below, surface of CBU
Fill CBU joints and any damaged areas with polymer modified mortar.
Lightly sand mortar – if required.
Protection:
Protect underlayment from rain and snow after installation to prevent moisture pickup.
B. Plywood Underlayment: 5/8” (15.9 mm) Plywood Underlayment Option for Applications Over Conditioned Areas (Habitable Areas) Only
See Plywood Sub Floor notes for plywood underlayment requirements.
Underlayment installation:
Place panels with joints maximum stagger from plywood subfloor joints. End joints to be placed not over structural framing but at 1/4 span point (ie 4″ off center for a 16″ joist spacing). Fit panels closely but do not force together, leave a maximum 1/8” (3 mm) gap at panel edges and ends. Leave 1/4” (6 mm) gap along walls. Fasten panels to subfloor while mortar is wet with 1-1/4 (32 mm) wood screws spaced 6″ o.c. in both directions and placed at 1/2” (12.5 mm) from ends and edges. Do not fasten into wood structural framing.
Finished surface to be true to plane within 1/8” in 10 feet (3.2 mm in 3 m).
Underlayment Preparation:
Ensure all screw heads are set at or just below surface of plywood.
Fill and any damaged areas with polymer modified mortar.
Lightly sand mortar – if required.
Protection:
Protect underlayment from rain and snow after installation to prevent moisture pickup.
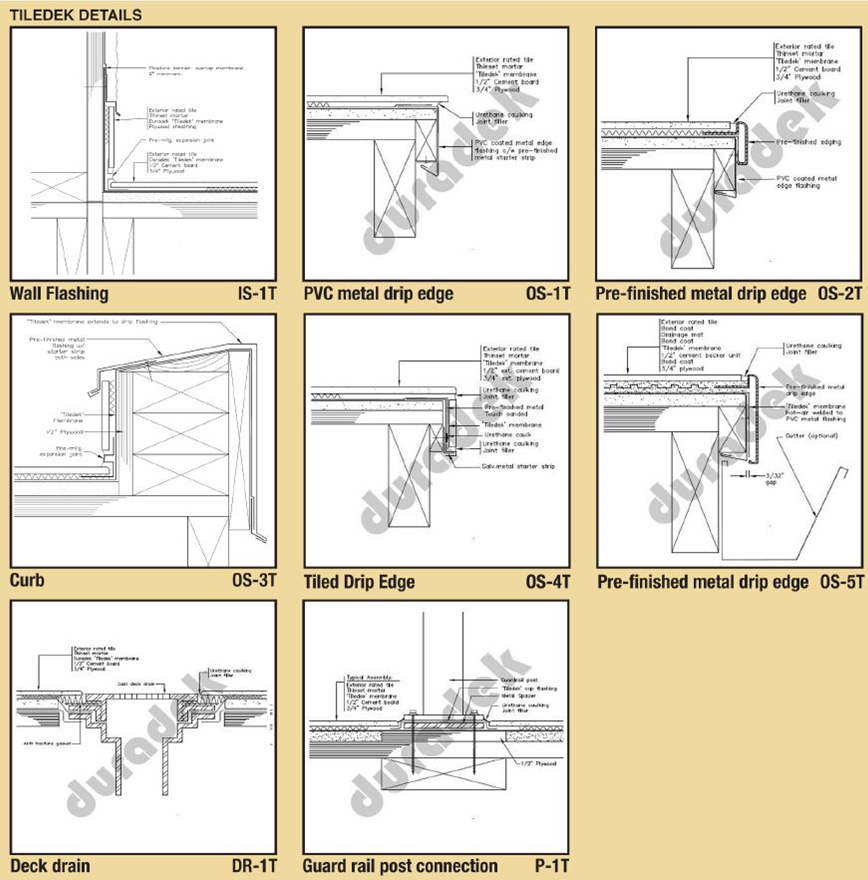
For the full collection of Detail Drawing for the installation of Tiledek,please refer to duradek.com/tiledek-resources
Get In Touch, We’re Here To Help
We’re dedicated to ensuring your success with our products. Whether you have questions about the product, installation, or project specifications, our team is here to help.