USA: 1-800-338-3568 | CANADA: 1-866-591-5594
Substrate & Assembly Details
Success with Outdoor Tile Decks: From the Bottom Up
For any exterior tile deck project from a small landing to an expansive flat roof deck, its long term success depends on best practice standards for the assembly. Choosing reliable products that are suitable for the project’s specific needs and are compatible with each other is a big part of that.
Duradek’s Tiledek underlayment is building code compliant as a roofing membrane.
Tiledek is the most reliable waterproofing method to include in your exterior tile assembly. It is a critical component in preventing leaks. Tiledek will help provide a worry-free tile deck for many years of enjoyment.
Our expertise is in keeping the water out of living space beneath decks and balconies.
We are not tile setting experts. We will not give advice on each stage of the assembly. However, we are here to assist you in knowing the right questions to ask of the appropriate manufacturers and contractors.
Is Tile the right choice for your deck?
The first questions to ask are:
- Does the deck or flat roof have enough clearance between deck structure and entry points to allow for the depth of the built-up assembly?
- Can the deck support the added weight of heavy tile or stone?
Once those factors have been determined and you have chosen to proceed with a tile deck, each step in the assembly should be considered.
Be sure to refer to these important resources before you begin:
Exterior Tile Deck Assembly Details
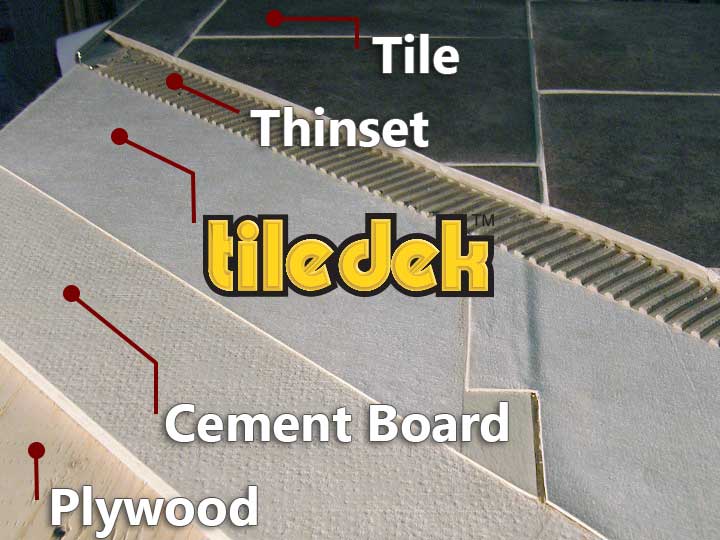
Before the Tiledek waterproofing underlayment is installed, there are 3 stages to the assembly.
- 1 – Wood Deck Construction
- 2 – Plywood Sub Floor Construction
- 3 – Underlayment (Plywood or Cement Board)
For detailed substrate preparation information, see our Substrate and Edge Trims page.
Is your tile deck above living space or above an open area?
This will usually dictate whether a plywood underlayment or a cement board underlayment should be used over your plywood subfloor.
Your assembly needs to be very stiff and flat.
It must be built to substantially reduce structural deflection. The flatness is important to ensure at the beginning phases of the assembly as it cannot be addressed later. The surface must be completely flat before the waterproofing membrane is applied.
The next stages of the assembly address the waterproofing element and the finished surface.
- 4 – Tiledek Waterproofing Underlayment
- 5 – Uncoupling/Drainage Mat (optional with 2 schools of thought – read details in the Tiledek White Paper)
- 6 – Thinset Bonding Adhesive
- 7 – Tile or Stone
The waterproofing underlayment should be professionally installed by an expert in roof-grade waterproofing. Special attention must be paid to points of vulnerability such as corners, perimeters, entranceways, and water routing components.
Tiledek is installed only by Duradek trained waterproofing professionals.
Duradek applicators are skilled in detailed waterproofing techniques and have exclusive access to Duradek’s 40+ years of waterproof detailing expertise. With the waterproofing component of your assembly confidently in place, your project is ready to accept the tile application with a suitable thinset mortar.
Your choice of mortar and tile is important.
It must be suitable for your climate and to be able to handle any freeze/thaw conditions. The manufacturer of those products will provide guidance on your selections.
Please Note: Duradek only supplies the waterproofing component of the assembly. For remaining assembly components always refer to the manufacturer’s written instructions. Check local building codes for specific requirements for your outdoor tile project.